Set up a DVR, ou stand-alone, to be accessed remotely is no big deal, but for those who have no experience below follows a step by step tutorial on how to set up your stand-alone to view your cameras from anywhere that has internet access.
1º Step: Check the information of your network
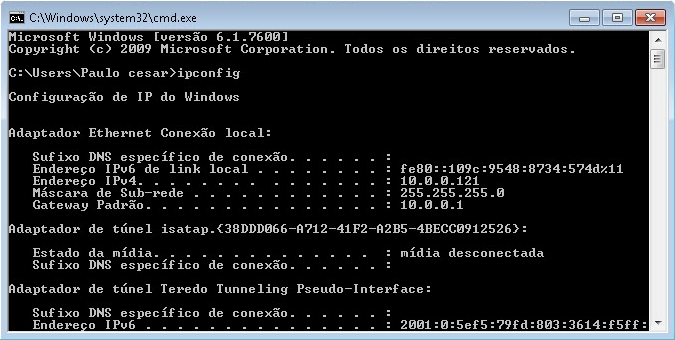
click in Start > run > type it CMD e de enter.
No Command prompt which opened type ipconfig e de enter.
Record the following information for later use:
- Subnet Mask
- default Gateway
2º Step: Configurar o stand-alone (internal and external access)
As there are several models the way to configure each DVR may vary, but the premise is the same.
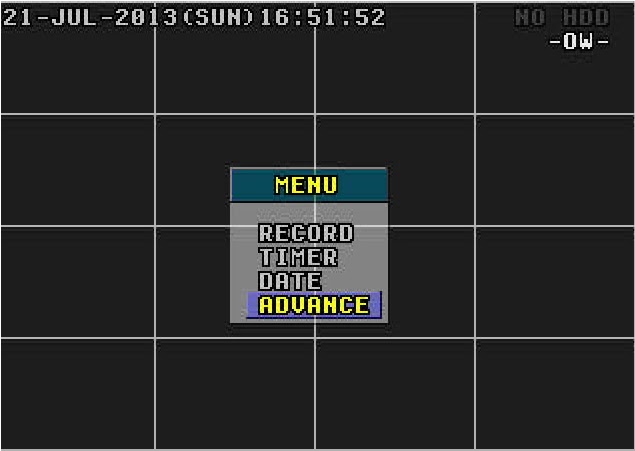
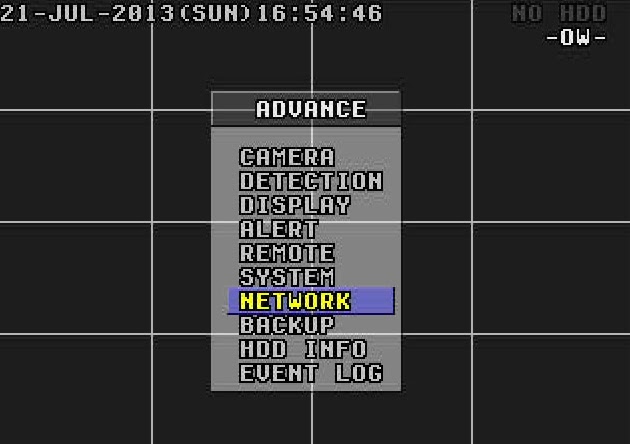
Menu > Advance > Network
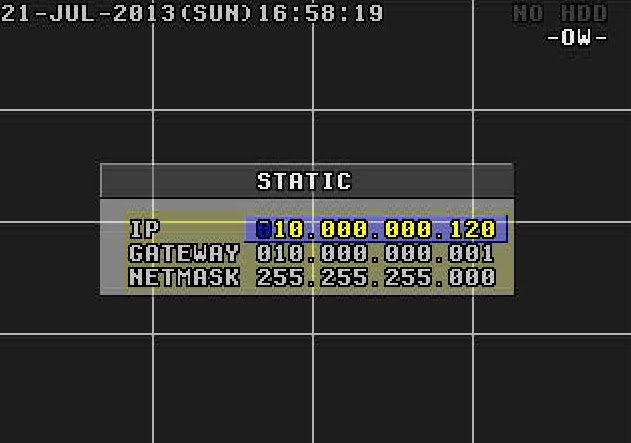
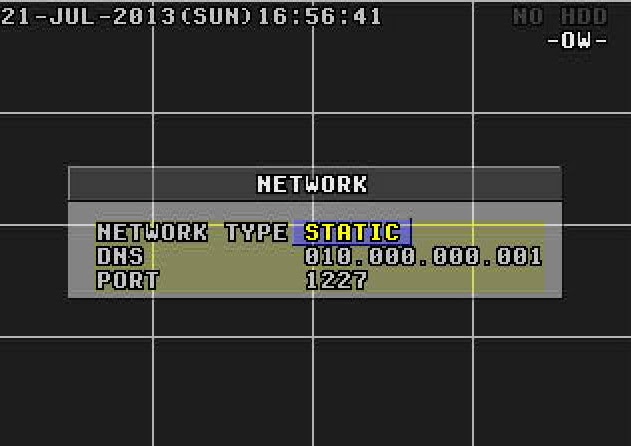
In Network Type, of O.k in Static and put the information picked up from the computer.
IP: You prefer. ( Example: 10.0.0.120)
Gateway: 10.0.0.1
Netmask: 255.255.255.0
Go back to the Menu Network.
DNS: 10.0.0.1 (the same gateway)
Port: It is the gateway to access your DVR. In this example I'll use port 1227, but you can use the number of your choice.
Obs.: If what you want is internal access, that you can view the cameras from any computer or device that is connected to your internal network, already done you don't need to configure anything else. To view the cameras simply enter your internet browser and enter the following address: http://ip-stand-alone:door (Ex: http://192.168.0.120:1227)
3º Step: Fix external IP
In almost all internet services available, our external IP is not fixed, and yes dynamic, ie every time your router is turned off or disconnected the next made it to connect with your Internet service will be with a different IP. Then this problem, to access the stand-alone we need to know the external IP current network it is connected, since it is not feasible to go to the place where the stand-alone is physically to check the IP address every time the router is turned off we will use a service that updates the IP automatically.
The two most commonly used are the No-IP e o DynDNS, both are paid but the No-IP has the ability to upgrade for free up to three IP addresses per account, for this reason I will use the No-IP for demonstration, but in both the configuration is basically the same.
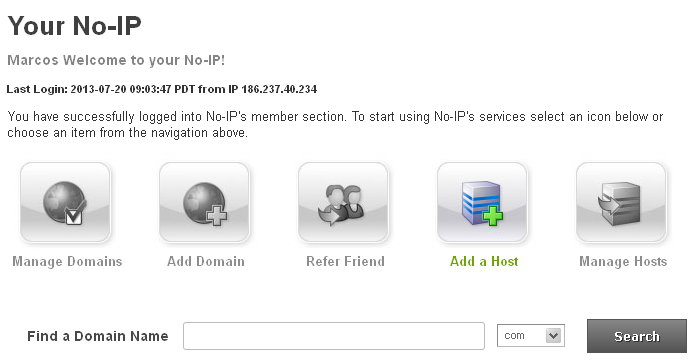
First create an account at No-IP, after that enter the account created and click “Add Host”.
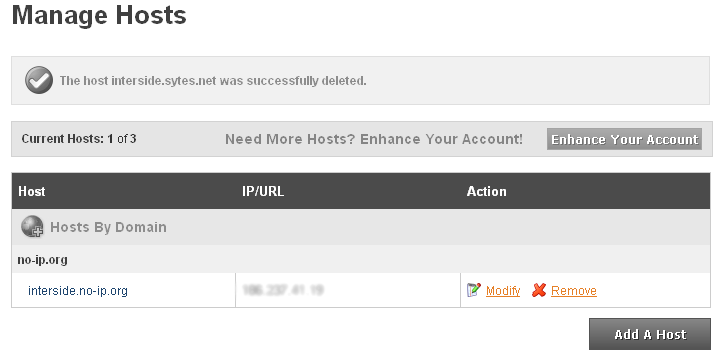
On the next page choose “Hostname” I had used to access your DVR, do not change anything and click “Add Host” at the bottom.
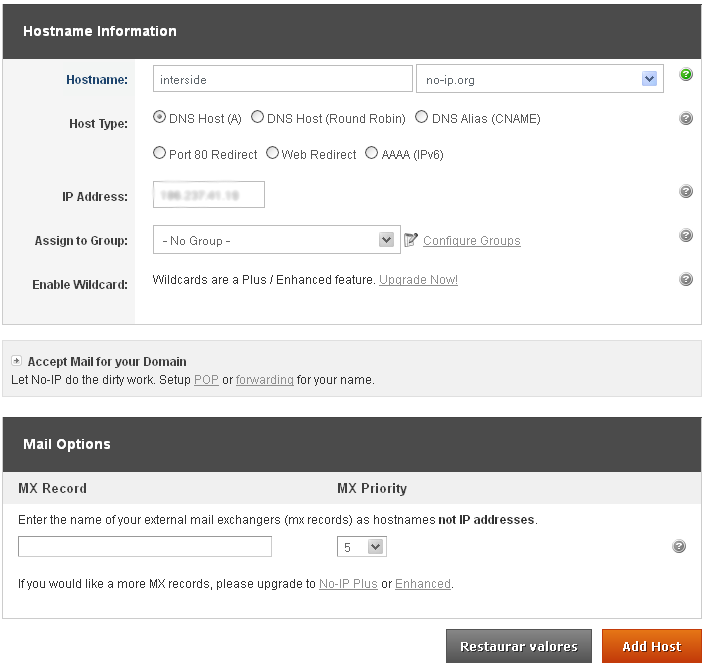
ready your hostname it is created.
4º Step: Configure the router:
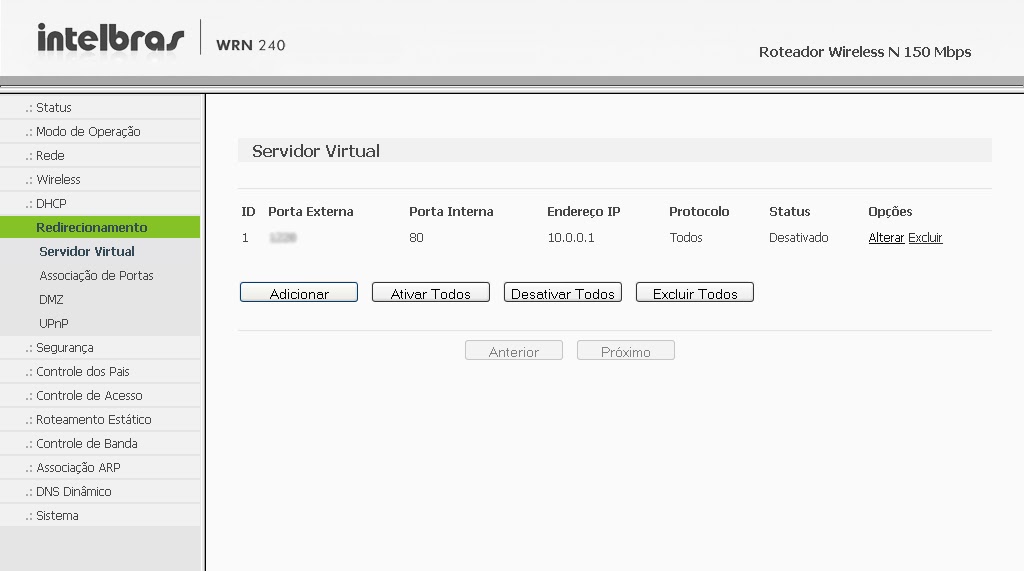
Now what we do is to set the IP and the stand-alone door. The router I'm using in this tutorial is the “WRN 240” gives Intelbras, but the configuration is basically the same for any router.
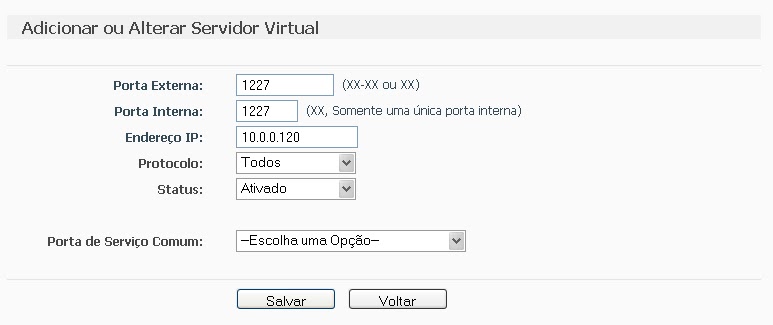
First you go redirection > Virtual server > Add
Place the information of the DVR and click save.
after saving, the port and IP that you set will look like this:
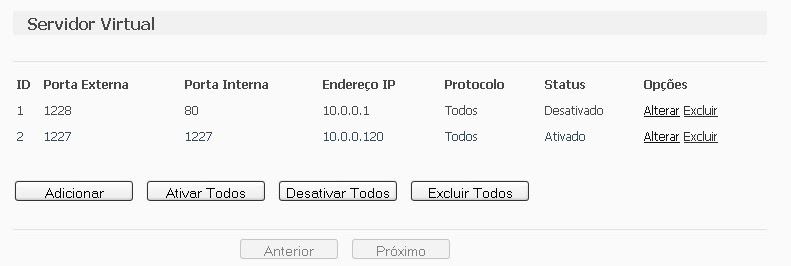 Some people prefer to make the release of the DMZ ports, as it will be shown abaixo, but by enabling DMZ on your modem or router, you will be compromising the security of your device. Always release the doors manually, as shown above..
Computer security, a DMZ or demilitarized zone (demilitarized zone or DMZ), also known as perimeter network, is a physical or logical subnet that contains and exposes an organization's external border services to a larger, untrusted network, usually internet. Any devices located in this area, this is, between the trusted network (usually the local private network) and the untrusted network (usually the Internet), is in the demilitarized zone.
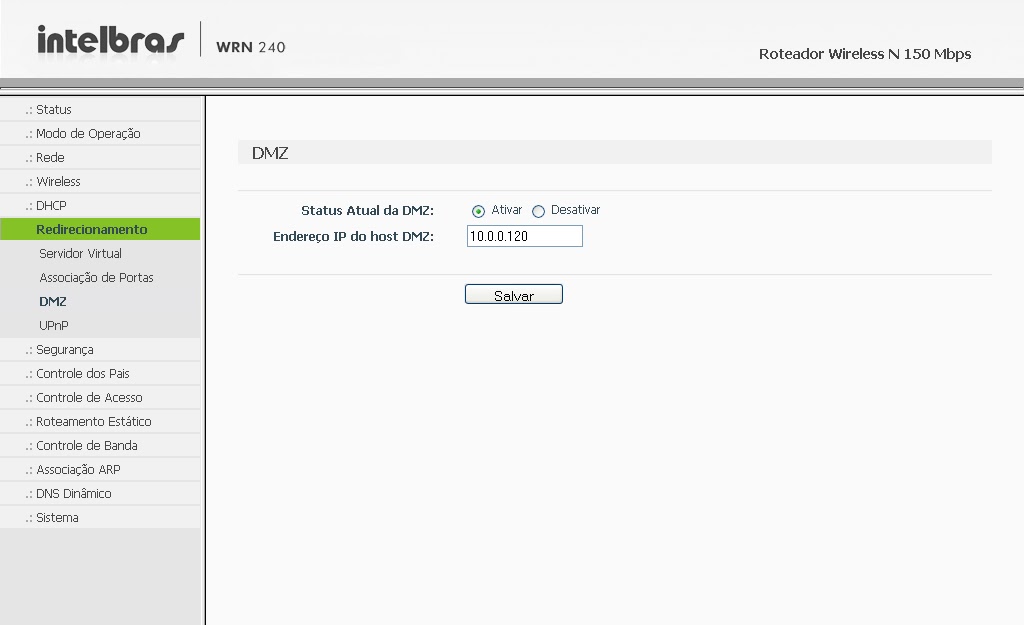
redirection > DMZ > Select enable, enter the IP of the DVR and save.
The next step is to configure the router to automatically update your network's IP in your NO-IP account.
Go to Dynamic DNS, enter your account information and the hostname/domain you created, click enter. After the “Connection Status” is like “Connected!” click save.
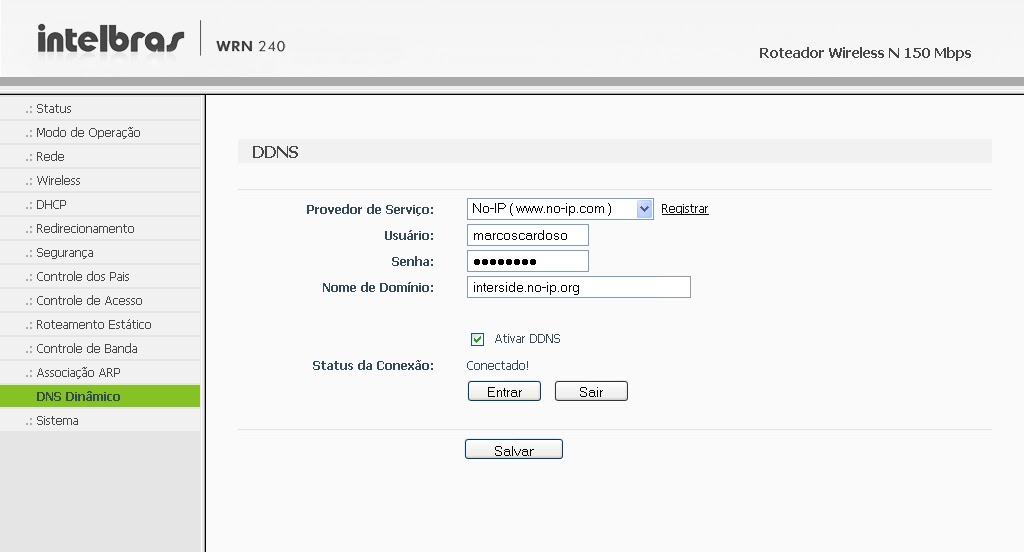
It is, Now you can view your cameras from anywhere in the world.
If you have questions or suggestions leave us comments.





321 Comments
"Anonymous", seu DVR provavelmente esta em uma classe de IP diferente do seu notebook, isso impede que você acesse o DVR internamente. Para resolver isso você pode conectar o DVR no roteador, ou colocar o roteador como ponte e usar a mesma classe de IP do modem.
O acesso externo você esta testando aonde? Se for na mesma rede também não vai funcionar. Você já testou as portas para ver se realmente estão abertas?
Good evening,Cardoso,segui todos os passos e não consigo acessar nem eterna e nem internamente.Possuo um modem Dlink da Vivo e um roteador.O DVR está conectado diretamente no modem e o acesso do meu note e pelo Wifi do roteador.Isto pode causar algum problema?Tenho que fazer alguma configuração no roteador?Thank you
Hélcio
"Anonymous", qual é o navegador que você esta usando para acessar o DVR?
"Agn B.S", alguns provedores de internet a radio permitem que as configurações sejam feitas só no roteador do cliente, a NAT é configurado no roteador do cliente mesmo.
Mas outras não têm essa simplicidade, você vai ter que entrar em contato com o provedor de internet e pedir para liberarem as "portas" para o IP que você precisa.
Você vai ter que ir no cliente para saber qual dos dois casos é o da internet dele.
Good evening!
comprei uma stand alone zmodo h.264 4ch,zmd-dd-sbn4, mas fiz de tudo para configurar, nem na rede interna eu consigo acessar.preciso acessar pela net.
gostaria de uma orientação passo a passo.
Olá Amigo, gostei muito do artigo, estou começando agora na área de CFTV, até agora não tive problema com as configurações internas, porem tenho um grande problema em mãos, no bairro onde moro a internet é via rádio, e o acesso ao modem e restrito ao provedor da internet, gostaria de saber se à possibilidade de eu fazer acesso externo sem a necessidade de alterar o modem, fazendo somente alterações no roteador, já criei uma conta DDNS, can you help me?
Desde já agradeço a atenção
Pessoal, eu resolvi o problema de um cliente pelo http://www.dlinkddns.com, bastando criar uma conta (grátis para quem tem modem ou roteador da Dlink), um host (ex: cliente2.dlinkddns.com) e configurando o DMZ e o DNS Dinâmico no roteador ou modem da Dlink do cliente. Com isso, toda vez que o IP da operadora for mudado, ele atualiza o dlinkddns para o novo IP. In this way, se precisar acessar o DVR ou as cameras via CMS ou browser, basta se conectar pelo host criado no dlinkddns.com.
BOA NOITE CARDOSO,CONFIGUREI SIM, TEM UMA OPÇÃO MOBILE COLOQUEI NA PORTA 1975. VOU RESETAR O DVR E DEIXAR NA PORTA QUE VEM DE FABRICA.
Eduardo, você configurou a porta para acesso pelo celular no Luxvision? (http://youtu.be/YPiW-9XlE8U)
Tenta usar o aplicativo "MEye":
Androi: https://play.google.com/store/apps/details?id=com.MEye
IOS App store: https://itunes.apple.com/br/app/meye/id329501794?mt=8
Good afternoon
A marca do DVR é Luxvision.
estou usando a porta 1975.
no aplicativo VMeye aparece succesful conection e depois da Erro code:-2.