Set up a DVR, ou stand-alone, to be accessed remotely is no big deal, but for those who have no experience below follows a step by step tutorial on how to set up your stand-alone to view your cameras from anywhere that has internet access.
1º Step: Check the information of your network
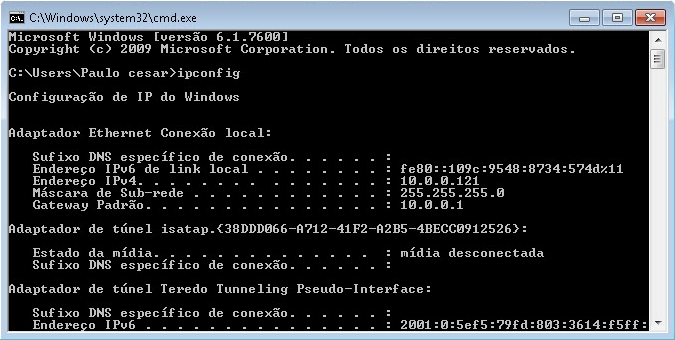
click in Start > run > type it CMD e de enter.
No Command prompt which opened type ipconfig e de enter.
Record the following information for later use:
- Subnet Mask
- default Gateway
2º Step: Configurar o stand-alone (internal and external access)
As there are several models the way to configure each DVR may vary, but the premise is the same.
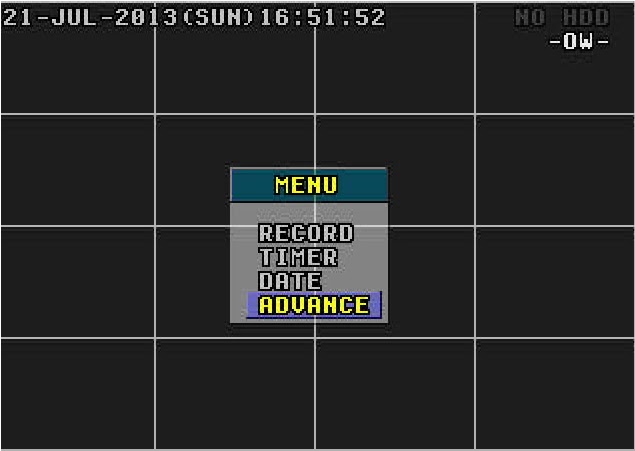
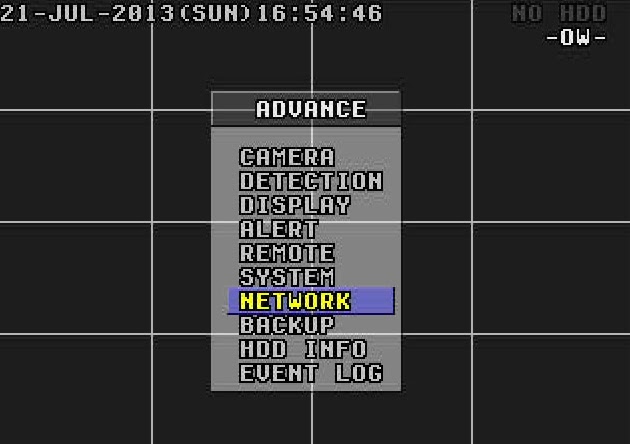
Menu > Advance > Network
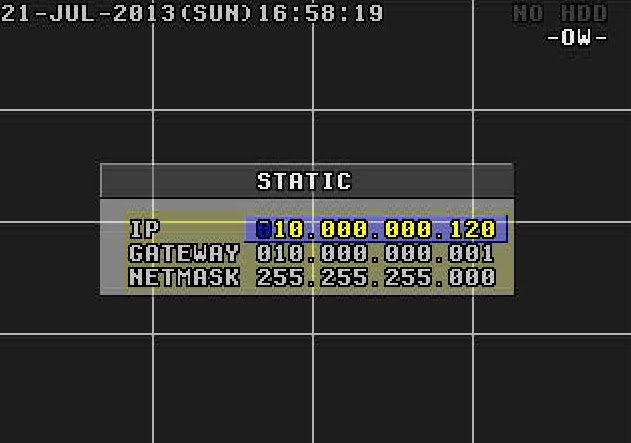
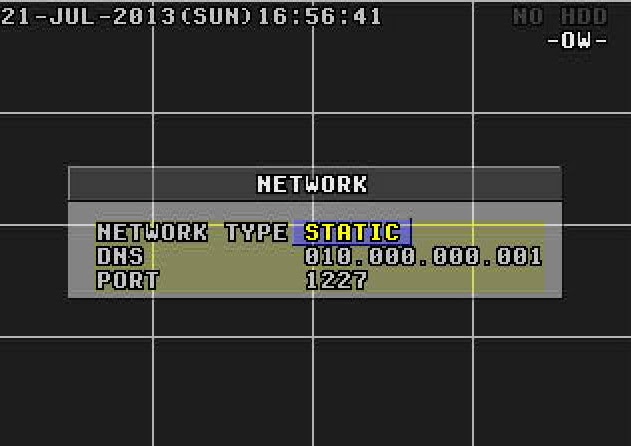
In Network Type, of O.k in Static and put the information picked up from the computer.
IP: You prefer. ( Example: 10.0.0.120)
Gateway: 10.0.0.1
Netmask: 255.255.255.0
Go back to the Menu Network.
DNS: 10.0.0.1 (the same gateway)
Port: It is the gateway to access your DVR. In this example I'll use port 1227, but you can use the number of your choice.
Obs.: If what you want is internal access, that you can view the cameras from any computer or device that is connected to your internal network, already done you don't need to configure anything else. To view the cameras simply enter your internet browser and enter the following address: http://ip-stand-alone:door (Ex: http://192.168.0.120:1227)
3º Step: Fix external IP
In almost all internet services available, our external IP is not fixed, and yes dynamic, ie every time your router is turned off or disconnected the next made it to connect with your Internet service will be with a different IP. Then this problem, to access the stand-alone we need to know the external IP current network it is connected, since it is not feasible to go to the place where the stand-alone is physically to check the IP address every time the router is turned off we will use a service that updates the IP automatically.
The two most commonly used are the No-IP e o DynDNS, both are paid but the No-IP has the ability to upgrade for free up to three IP addresses per account, for this reason I will use the No-IP for demonstration, but in both the configuration is basically the same.
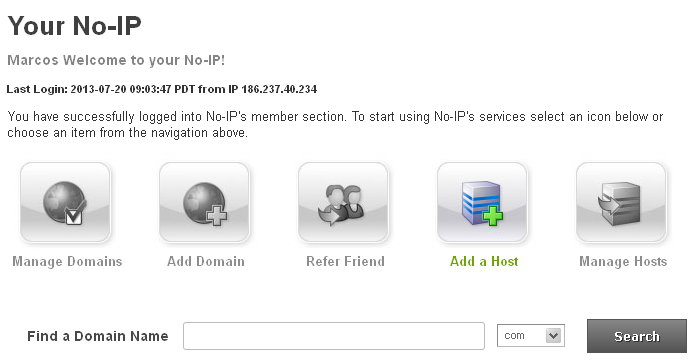
First create an account at No-IP, after that enter the account created and click “Add Host”.
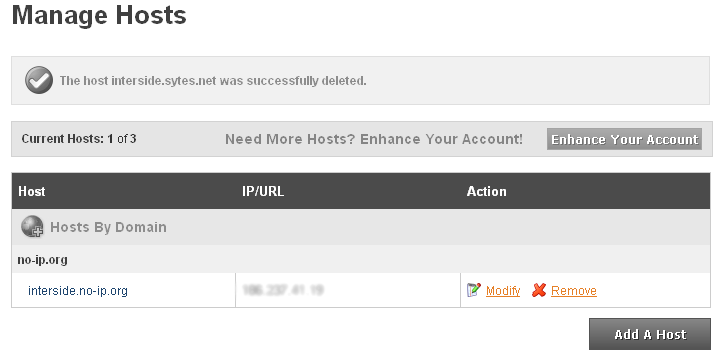
On the next page choose “Hostname” I had used to access your DVR, do not change anything and click “Add Host” at the bottom.
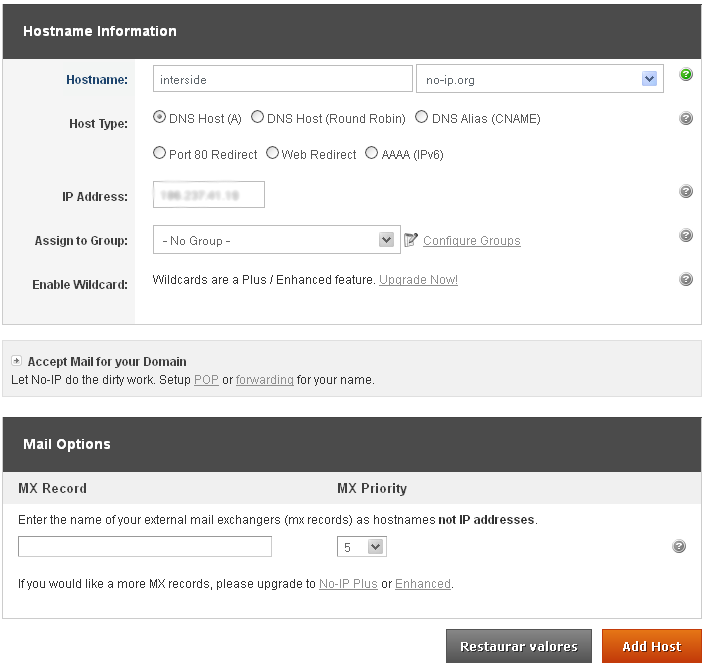
ready your hostname it is created.
4º Step: Configure the router:
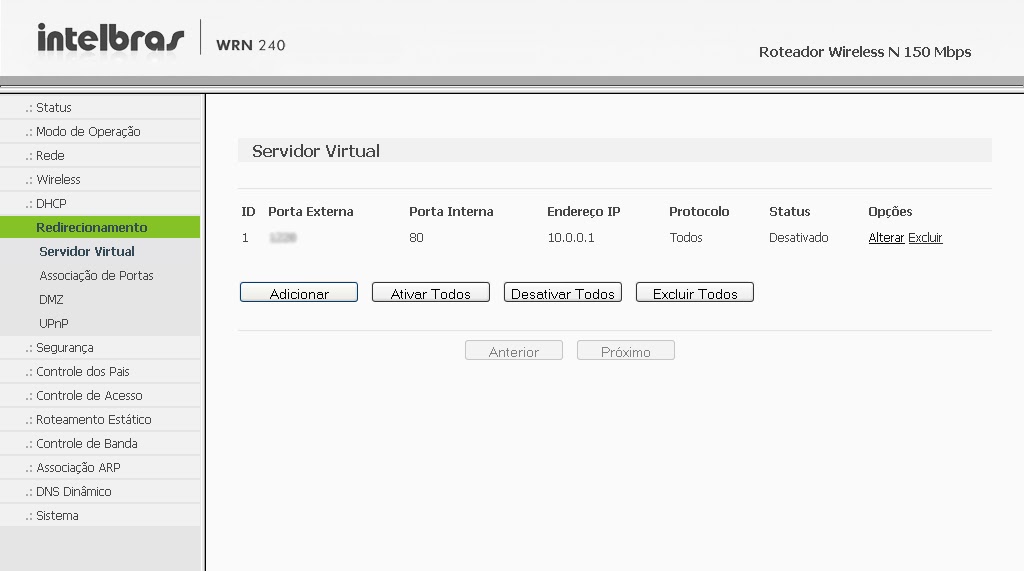
Now what we do is to set the IP and the stand-alone door. The router I'm using in this tutorial is the “WRN 240” gives Intelbras, but the configuration is basically the same for any router.
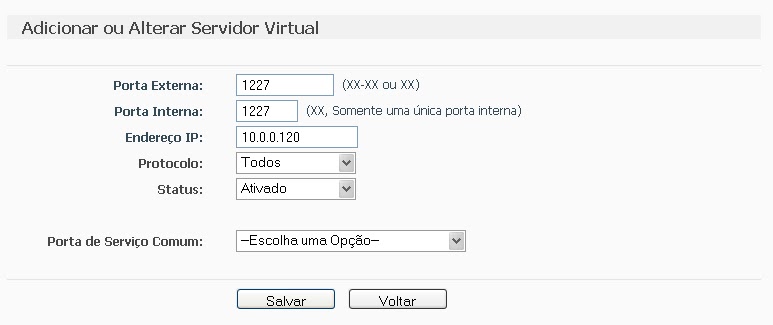
First you go redirection > Virtual server > Add
Place the information of the DVR and click save.
after saving, the port and IP that you set will look like this:
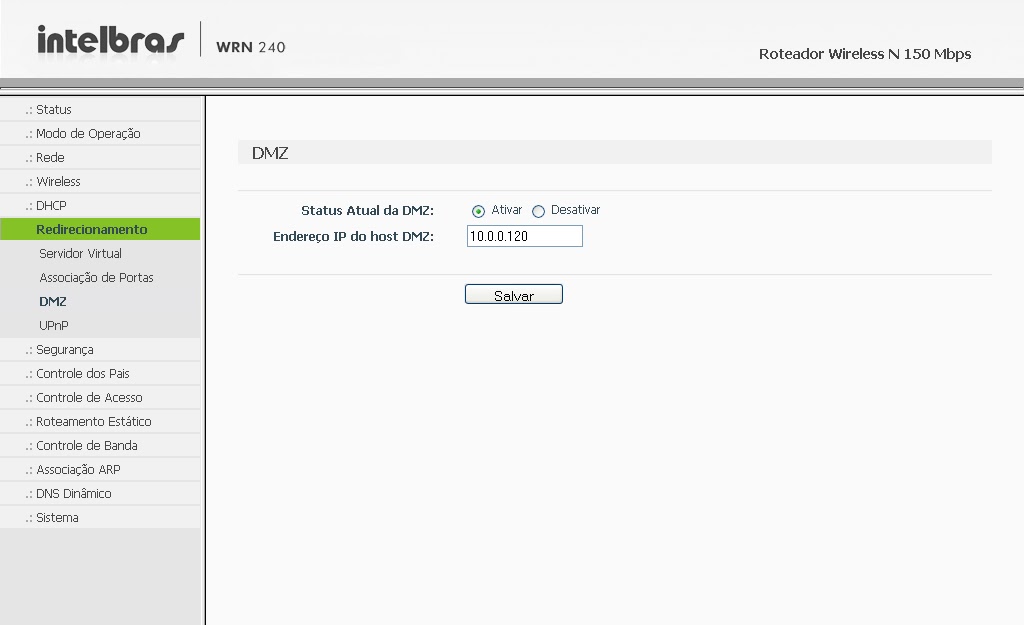
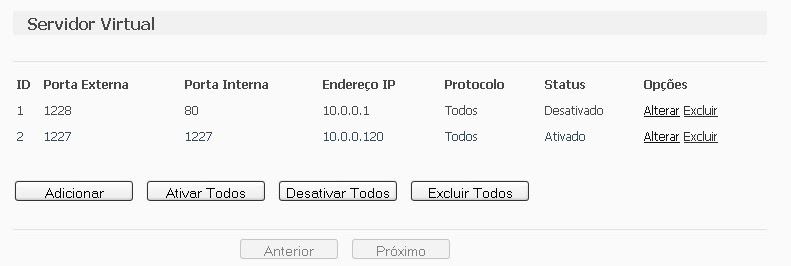 Some people prefer to make the release of the DMZ ports, as it will be shown abaixo, but by enabling DMZ on your modem or router, you will be compromising the security of your device. Always release the doors manually, as shown above..
Computer security, a DMZ or demilitarized zone (demilitarized zone or DMZ), also known as perimeter network, is a physical or logical subnet that contains and exposes an organization's external border services to a larger, untrusted network, usually internet. Any devices located in this area, this is, between the trusted network (usually the local private network) and the untrusted network (usually the Internet), is in the demilitarized zone.
redirection > DMZ > Select enable, enter the IP of the DVR and save.
The next step is to configure the router to automatically update your network's IP in your NO-IP account.
Go to Dynamic DNS, enter your account information and the hostname/domain you created, click enter. After the “Connection Status” is like “Connected!” click save.
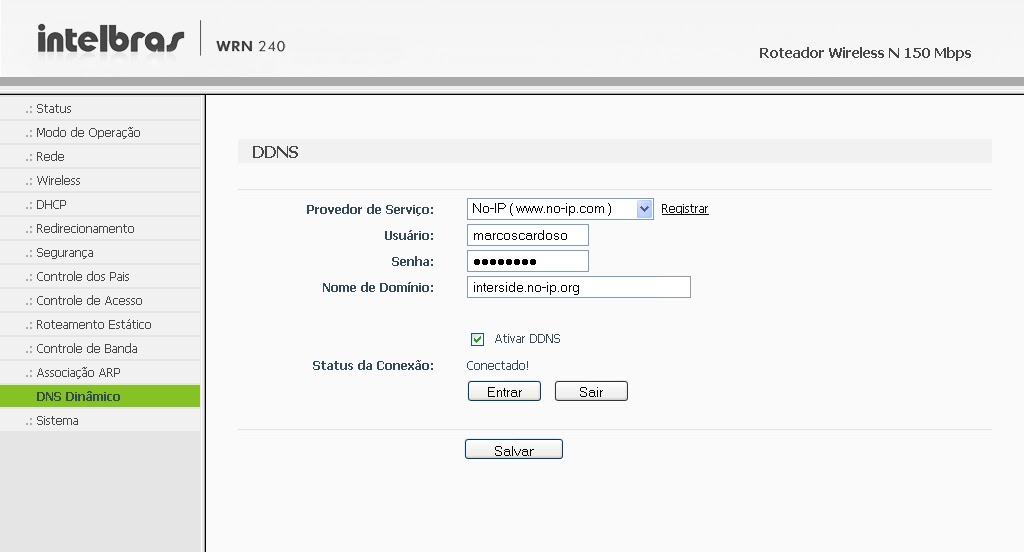
It is, Now you can view your cameras from anywhere in the world.
If you have questions or suggestions leave us comments.






321 Comments
Damn it, it's complicated. I entered all the fields as stated:
DVR Setup:
IP: 192.168.25.18
Subnet Mask: 255.255.255.0
Gateway: 192.168.25.1
Primary DNS: 192.168.25.1
Secondary DNS: 8.8.8.8
TCP port: 34567
Porta HTTP: 34568
Download HS: (you can leave it unchecked)
Routing the two ports on your GVT modem/router:
Rule name: (you decide. "DVR" for example)
Protocol: TCP/UDP
source IP:192.168.25.18
Source port:34567
destination IP:192.168.25.18
Destination port:34567
Rule name: (you decide. "DVR2" for example)
Protocol: TCP/UDP
source IP:192.168.25.18
Source port: 34568
destination IP:192.168.25.18
Destination port: 34568
After entering all this data, I went to the website (http://www.canyouseeme.org/)to check if the doors were open, and the answer was ok, both were.
I did the internal access and everything was perfect.
I put the IP in the DMZ field: 192.168.25.18
No campo UPnP: I left it enabled.
In the Dynamic DNS field:
*Provider: dyndns
*User name: "my website login"
*Password: "my website password"
*Hostname: "the name I created" followed by .dyndns.tv
Then I tried to do remote access and again I couldn't..
Then I disconnected my notebook from the network, I connected again and went to the website to check if the ports were open, and to surprise the same ones reported above as open, now they were no longer.
I honestly don't know where else to configure it to work remotely..
Good morning MA. I put the settings informed but I still haven't managed to do it.. OBS: I can only access the images remotely while on another internet network or I can also access them while on the same network where all the registered equipment is.?
In modem/router settings, what should I fill in the fields:
DMZ: ip(which ip?)…. enabled or not enabled?
UPnP: Enabled or not enabled? (no moment is enabled)
Dynamic DNS: I put here the information about my dyndns that I created…correct?
To access the remote images I must type the IP in internet explorer followed by : and the http port created on the dvr, Or should I put my identification created in dyndns followed by : e a porta http do dvr?
Junior, what is the IP of the modem, Router IP and DVR IP?
The IP that is used to direct modem ports to the router is not the same IP that you use to access the router.
Example:
IP modem: 192.168.1.1
IP that the modem gave to the router: 192.168.1.2
IP router: 192.168.2.1
IP DVR: 192.168.2.20
The IP you would use to port the modem to the router is the IP made available by the modem to the router, in the example it is the IP 192.168.1.2. Remembering that you have to set the IP on the router.
I have a dvr cop br 4ch, I have already done remote access with the same model with it connected directly to the modem with the ports released and the DDNS settings made on the modem. Now I'm having trouble installing another one, but now the network has a router between the dvr and the modem., I've already tried releasing the telsec modem ports 9000 for dlink router 524 and from the router to the dvr, but nothing works, can you help me?
Fernando, What is the IP of your modem/router?? IT IS 192.168.25.1 same?
If this is the IP of your modem/router you will have to change the settings on your DVR.
DVR Setup:
IP: 192.168.25.18
Subnet Mask: 255.255.255.0
Gateway: 192.168.25.1
Primary DNS: 192.168.25.1
Secondary DNS: 8.8.8.8
TCP port: 34567
Porta HTTP: 34568
Download HS: (you can leave it unchecked)
Routing the two ports on your GVT modem/router:
Rule name: (you decide. "DVR" for example)
Protocol: TCP/UDP
source IP:192.168.25.18
Source port:34567
destination IP:192.168.25.18
Destination port:34567
Rule name: (you decide. "DVR2" for example)
Protocol: TCP/UDP
source IP:192.168.25.18
Source port: 34568
destination IP:192.168.25.18
Destination port: 34568
Good morning my friend. Yes, I configured the host inside my GVT modem/router. I can access the images without any problem internally, but not externally. I tested the doors and they are ok. Below I will send you information about my system as it comes from the factory and how I should proceed to make it work.:
Camera receiver factory data:
IP: 192.168.1.18
Subnet Mask: 255.255.255.0
Gateway: 192.168.1.1 (giving the command "ping 192.168.1.1" The message "order timeout has expired" appears)
Primary DNS: 8.8.8.8
Secondary DNS: 202.101.172.35
TCP port: 34567
Porta HTTP: 34568
Download HS: "This field comes with a check box and is unchecked"
Data on my PC when giving the IPCONFIG command:
IPv4: 192.168.25.2
Subnet Mask: 255.255.255.0
default Gateway: 192.168.25.1
Fields to be filled in on my GVT modem panel when entering the "port forwarding" settings" to release the doors:
Rule name:
Protocol:
source IP:
Source port:
destination IP:
Destination port:
Therefore, with the above information to be filled in my modem, How should I fill in the fields???
Fernando, in addition to the username and password, you configured the DynDNS host?
Have you already forwarded the ports on the router? And tested the doors?
Website to test port: http://ping.eu/port-chk/
*First test with your external IP, then with the host.
Good evening. I have a problem and so far I haven't been able to find anything on the net. I can access my DVR on the network through the IP configured on it and HTTP port, but I can't access the internet through the DDNS account I made in Dyndns. I configured the GVT router/modem with the Dyndns username and password, I released the doors, but still i can't access. Can anybody help me?
Mateus, have you targeted the ports and tested to see if they are open?
Cardoso. I managed to access my dvr internally through internet explorer and xmeye. As for external access, I was unsuccessful in both. What can be?