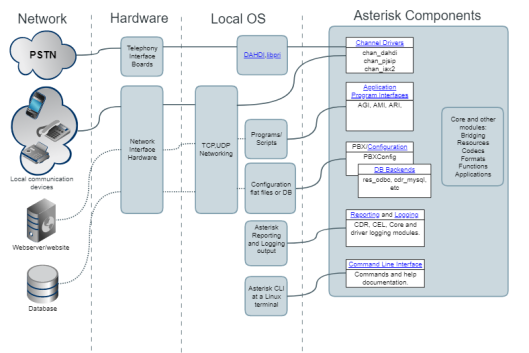
 Asterisk is a software implementation of a private branch exchange (PBX). It allows phones interfaced with a variety of hardware technologies, make calls to each other and to connect to telephony services, as the public switched telephone network services (PSTN) and voice over IP (VoIP). Its name comes from the asterisk symbol "*".
Some of the many Asterisk features include:
- Asterisk software includes many features available in commercial PBX systems and owners: voice mail, conference call, interactive voice response, automatic call distribution.
- Users can create new functionality by writing scripts dial plans in a number of own extensions Asterisk, adding custom loadable modules written in C or implementing AGI programs (Asterisk Gateway Interface) using any programming language able to communicate via standard A transmission system (stdin e stdout) or network TCP sockets.
- Asterisk supports a number of standard voice over IP protocols, including the Session Initiation Protocol (SIP), MGCP (Media Gateway Control Protocol) e 323.
- Asterisk supports most SIP phones, acting as registrar and back-to-back user agent.
- To support a variety of traditional telephony and VoIP, Asterisk allows implementers to create telephone systems or migrate existing systems to new technologies.

Install the asterisk source
Once you log in to your Ubuntu server as a user, run the following command to change to the root user.
$ sudo su
Now you are root, but you need to set the password with the following command.
# passwd
The next step would be to install initial dependencies for Asterisk.
# apt-get install build-essential wget libssl-dev libncurses5-dev libnewt-dev libxml2-dev linux-headers-$(uname -r) libsqlite3-dev uuid-dev git subversion
Installing Asterisk
Now, when we are in as root and the dependencies are satisfied, we can move to the / usr / src / and download the latest version of Asterisk.
# cd /usr/src
# wget http://downloads.asterisk.org/pub/telephony/asterisk/asterisk-15-current.tar.gz
Then, descompactamos.
# tar zxvf asterisk-15-current.tar.gz
Now we need to enter the new unzipped directory,
# cd asterisk-15*
Before actually compile the Asterisk code, we need “pjproject”, as the asterisk-15 introduces support for pjsip. So let's compile it first:
# git clone git://github.com/asterisk/pjproject pjproject
# CD pjproject
# ./configure –prefix=/usr –enable-shared –disable-sound –disable-resample –disable-video –disable-opencore-amr CFLAGS=’-O2 -DNDEBUG’
# make dep
# make && make install
# ldconfig
# ldconfig -p |grip pj
Configuring Asterisk
And now we begin to configure and compile the Asterisk code.
# cd ..
# contrib/scripts/get_mp3_source.sh
# contrib/scripts/install_prereq install
This will install the mp3 ringtones and satisfy additional dependencies that can take some time and ask for the code of your country. The following command will compile and install Asterisk.
# ./configure && make menuselect && make && make install
when finished, to prevent hundreds of configuration files, after installation, you usually want to run this command, which will make the initial setup for you:
# make samples
And to make the startup script installed and activated to start the Asterisk at every boot, we run make config, followed by ldconfig:
# make config
# ldconfig
Now we can start the first Asterisk and see if it really works.
# /etc/init.d/asterisk start
and then we can enter the Asterisk console with the command.
# asterisk -rvvv
Now we need to take additional steps to run it as an Asterisk user. First we need to stop Asterisk.
# systemctl stop asterisk
So we need to add the user and group called asterisk.
# groupadd asterisk
# useradd -d /var/lib/asterisk -g asterisk asterisk
Asterisk must be configured to start as the user we just created, We can edit the / etc / default / asterisk manually, but it is more efficient to use the two commands sed.
# sed -i ‘s/#AST_USER=”asterisk”/AST_USER=”asterisk”/g’ /etc/default/asterisk
# sed -i ‘s/#AST_GROUP=”asterisk”/AST_GROUP=”asterisk”/g’ /etc/default/asterisk
To run properly, the asterisk user needs rights for all asterisk key directories.
# chown -R asterisk:asterisk / var / spool / asterisk / var / run / asterisk / etc / asterisk / var /{lib,log,spool}/asterisk /usr/lib/asterisk
The asterisk.conf also need to be edited to remove the comment lines for runuser and run group:
# sed -i ‘s/;runuser = asterisk/runuser = asterisk/g’ /etc/asterisk/asterisk.conf
# sed -i ‘s/;rungroup asterisk = / = rungroup asterisk / g’ /etc/asterisk/asterisk.conf
When this is done, reboot the server so that Asterisk appear automatically by systemd and enter asterisk -rvvv to enter the Asterisk console.
# asterisk -rvvv


